Sunday, February 14, 2016

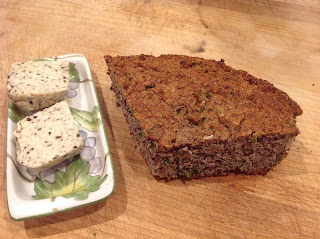
Mushroom and Kale Heirloom Cornbread

If you consider yourself a foodie, you need to follow Kenji Lopez and his blog, Serious Eats.  I adapted his delicious cornbread recipe to use up some fresh ground heirloom red cornmeal and the overflow bounty of kale that showed up last Friday in my farm box, along with some mushrooms I had on hand.    What I liked about this recipe is that it is not your typical sweet cake-type cornbread ala Marie Callendar's.  I think most people would agree that sweet cornbread (especially drizzled with honey butter) is delicious.  However,  if  you are watching your sugar and carb intake very carefully like I am, you need to make choices with what you eat. 


This recipe was a great compromise between sweet and savory and produced a very hearty, earthy bread that could practically be a meal by itself.   What I especially loved was the strong mushroom flavor this had, and how wonderful the candy cap mushrooms made the house smell as it baked.  If you have never used them before, candy cap mushrooms are the most amazing thing ever.  They smell like maple syrup and are often called the dessert mushroom.  I first discovered them at Far West Fungi, a great mushroom shop in San Francisco's Ferry Building. I was walking past the store and could smell them through their sealed packaging as I passed by.  Too hard to resist - I had to try this unique mushroom, so I bought a package of dried candy caps and made this awesome butternut squash and candy cap mushroom creme brulee from the chef at Pine Ridge Vineyards:  http://www.touringandtasting.com/desserts/pine-ridge-butternut-creme-brulee

I will admit, candy caps are not inexpensive, but I had 1/2 a bag left over from the creme brulee and this cornbread recipe seemed especially suited for them.  When I read Kenji's post about making cornbread that wasn't sweet, it struck me that I could use these mushrooms to add sweetness without adding sugar.  To intensify the mushroom taste, I also decided to add a package of shitakes that had been in my fridge way too long, and were starting to dehydrate. 

You can find the base recipe at this link (I don't think it's right to just copy someone else's recipe, so sorry for the redirect): http://www.seriouseats.com/recipes/2015/01/moist-and-tender-brown-butter-cornbread-recipe.html  However, I will share the modifications I made.    

1) In place of the fine yellow cornmeal called for in Kenji's recipe, I used 1 cup of coarse-ground heirloom red corn cornmeal.  This added protein, gave the bread a very robust wholesome flavor, and intensified the crunch this bread derives from being cooked in a cast iron skillet.

2) To pack this cornbread with vegetables,  I added the following items to the wet ingredients in step 2 of Kenji's recipe:

  • 2 cups fresh lacinato kale, stems removed, cut into slivers
  • 1 thick slice (3/8 inch) of yellow onion, minced (LOVED the way this tasted in the bread)
  • 1 cup of fresh shitake mushrooms, finely chopped
  • 1/2 oz dried candy cap mushrooms, ground into powder in a spice grinder (or a high speed blender) 
I followed the rest of the recipe as described, including baking the cornbread in a cast iron skillet.  It turned out great.  As soon as it was ready to cut open, I couldn't resist spreading a slice with some truffle butter for that ultimate mushroom rush. 


Saturday, February 13, 2016

Roasted Beets in Creamy Diabo Sauce


This recipe makes a great chilled side salad but it's also good enough for eating on its own and makes a light lunch with some fresh cheese like burrata, or a dollop of greek yogurt.  It is both sweet and spicy and very satisfying.

I know I am a bit odd, but I like to make my lunch for work every day.  If I am making this dish for lunch, I will get up and pop the beets in the oven (if I haven't made them ahead of time).  Once I'm done with my morning routine, I'll take the beets out, have breakfast and make the sauce while they cool, then chop, toss, and put in a small container to let them finish marinating until it's lunch time.  If you are not interested in pulling this together in the morning, you can make it the night before.  The beets can even be made several days in advance, just keep them in their foil packets until you're ready to use them.

Roasted Beets
Preheat the oven to 375 degrees

Per person:
1 large beet, washed, tops removed and tail trimmed
1 tbsp olive oil per person
Salt & Pepper

Tear off a piece of foil large enough to enclose each individual beet.  Place each beet in the center of the foil, drizzle with 1 tbsp olive oil and sprinkle with salt & pepper.  Wrap the beet tightly in the foil to trap all the steam while it cooks, and place on a baking tray lined with parchment paper (for easier cleanup, in case the packages leak) in the pre-heated oven.  Roast for 45 min to 1 hour, until the beets are fork-tender all the way through.

Remove from the oven and let cool for 15 to 30 minutes.  Once cool, open the packets and gently rub the skins off using your hands or a paper towel. Chop the beets into small dice.

Diabo Sauce

I love this ghost pepper-basedsauce from the restaurant "Fat Rice" out of Chicago.  Yes, it's incredibly hot but when used sparingly it adds a great level of flavor plus heat to your dish.  Fat Rice's online store (https://squareup.com/market/loco-food-llc) describes the sauce as follows:

In the Indian state of Assam the Bhot Jolokia is the Maharajah of all chillies. Ranking as one of the hottest peppers on the planet, the “ghost pepper” tops out at over 1MILLION on the scoville scale. Diabo is a Fat Rice favorite! Sinful yet sweet with a whole lot of heat!  Indredients: Carrot, Habenero, onion, cane vinegar, water, ghost pepper, garlic, cane sugar, salt xanthan gum
If you don't want to order some Diabo sauce, you can substitute any other liquid chili sauce (Tapatio, Tabasco, etc.  Mix the other ingredients then add your sauce a drop at a time to your desired heat level.)

Per Person:
1 Tbsp mayonnaise, regular Vegennaise, regular or light sour cream, or Greek yogurt
1/4 tsp Diabo Ghost Pepper Sauce
2 tsp finely chopped fresh parsley
1 tsp lemon zest
a pinch of salt

Blend the ingredients together and toss with the diced beets.  Let marinate for at least hour, but can be made a day or two ahead of time if desired. 

Friday, February 12, 2016

Farm Box, How Do I Love Thee? Let Me Count the Ways

This week's bounty!
I love Fridays when my farm box arrives. For someone who likes to cook, it's like a Christmas present appearing on the doorstop every other week.  The program I have lets me customize my box, and somehow, this week, I think I must have had a major Alzheimer's moment, because I added a lot of stuff to my box, but forgot to remove the things I didn't want.  The end result:  three different types of brocolli, three different types of mushrooms, too many types of greens to count, and all of this coming at the start of a three day weekend which I would be spending in Tucson, celebrating my Dad's 87th birthday. 

With such an abundance of cruciferous brassicas, I decided I had better make something with them right away.  Meaty, hearty roasted romanesco was my choice for today's lunch.  Romanesco is sometimes called cauliflower and sometimes brocolli, and I think the naming confusion occurs because it's actually a cross between the two vegetables.  It is supposedly a good source of numerous vitamins and minerals, including vitamins A, C, and K as well as folate, fiber, iron, manganese, carotene, protein, zinc, and omega-3 fatty acids.

My recipe had to be fast, because not only did I need to prepare it this morning before leaving for work, but I also needed to wash, prep and store all the rest of the vegetables.  I decided to simply roast it with salt, rosemary, olive oil, garlic and a kiss of cayenne.  This is a classic and easy preparation which requires just a little chopping followed by tossing the ingredients together then spreading on a baking sheet and roasting for about 25 minutes.

Since this was going to be my lunch, I decided to add some grated parmesan cheese and nuts to boost the protein content.  However, I ran out of time to toast the nuts, and I happened to have a bag of Good Bean "crispy crunchy" chickpeas, so I used those instead.  I think that toasted sliced almonds or pinenuts would also have been really delicious.  In hindsight, it would have been best to add the chickpeas just before eating, because they lost a little of their crunch after sitting in my lunchbox for a couple of hours.


Garlic and Olive Oil Roasted Romanesco

Preheat oven to 400 degrees and place rack in middle of oven

I head of Romanesco, broken into even size florets and sliced about 1/2 inch thick
2 Tbsp extra virgin olive oil
1 tsp minced fresh rosemary
2 large cloves garlic, minced
1/2 tsp salt
optional:  1/4 tsp cayenne pepper

Place all the ingredients in a ziplock bag, toss well to distribute the seasoning, then spread evenly on a parchment-lined baking tray (to make clean up easier).  Roast for 20-25 minutes until the vegetables develop a nice dark carmelization in spots.


If adding nuts and cheese, use 2 Tbsp each of your favorite toasted nuts and grated cheese such as parmesan or another hard flavorful cheese. Add after the vegetables come out of the oven. 


Thursday, February 11, 2016

" If you see Mt. Fuji, a hawk, and an eggplant on New Year's Day, you will be forever blessed."


Roasted Eggplant Salad with Smoked Almonds and Goat Cheese

You come across the oddest things while surfing the internet looking for eggplant recipes.  Given that we're in the thick of the Chinese New Year's celebration, this proverb seemed both fitting and a good omen.  

I love eggplant in just about every preparation except raw.  Raw, it's pretty disgusting, but baked, roasted, fried, sauteed, whatever - I love it all. The best thing about eggplant is how it embraces the flavors of whatever it's cooked with.  

Today's recipe - Roasted Eggplant Salad with Smoked Almonds & Goat Cheese - came from The Kitchn and can be found at this link: http://www.thekitchn.com/recipe-roasted-eggplant-salad-with-smoked-almonds-goat-cheese-164756.  I discovered this at about 5:30 AM the other day as I soaked in the bathtub surfing for something to make with the three eggplants I currently have in fridge.  It intrigued me for several reasons -- I love anything smoky, and this called for smoked paprika (of which I have an abundance, as mentioned in earlier posts). Additionally, it had these great toasted almonds in it with give the dish an excellent crunchy texture.  Last but not least:  it includes goat cheese. Yum. I can't say no to goat cheese.

We made it with only one minor substitution - we didn't have smoked almonds (and who wants those chemical coated nuts anyway?), so we toasted and added plain almonds instead and they were great.  I would make it the same way again.  It is a little tangy, sort of like a relish, but retains that creamy eggplant flavor that always reminds me of Italy. The addition of the smoked paprika draws in flavor profiles of the Middle East; it would be great scooped onto some fresh, home made pita bread.  One word of caution - a whole eggplant does not go very far when prepared in this fashion.  We ate this as a standalone dinner but it was a little on the light side, making about 3 cups altogether.  I would definitely make it again as a light meal or a side dish to accompany fish, chicken, or lamb.

Carrots for Breakfast and the Other 40%


I was listening to a the Kitchen Chat podcast on the way home from work the other day that discussed food waste in America. Guest Dana Gunders, a staff scientist at the Natural Resources Defense Council, quoted a statistic that 40% of all food in America goes to waste, and that landfills are mainly filled with tossed food.  I am not sure I agree with that last statement, having spent a lot of time at the dump getting rid of yard waste from my always-overgrown backyard, but nonetheless, I do agree that there is a lot of food waste.  When you think how much water, energy, and other resources are dedicated to producing food, it's not hard to see how our green footprint could be improved by wasting less food.  (link to Kitchen Chat podcasts here)


My ingredients:  Brussels sprouts, horseradish,
parsnips, tumeric root, carrots, and 1/2 a shallot
Gunders recommends keeping a bin or place in your fridge with nearly expired foodstuffs as a reminder to eat those things first.  I don't have a bin, but I do actively attempt to use up expiring food first and to make the best use out of all parts of the groceries I buy.  In fact, for me I think it almost becomes like a game - what can I make with this odd assortment of items today?  One of my favorite ways to relax is to make an inventory of what's in my veggie bin or my chest freezer, and then spend an hour soaking in a bubble bath while reading cookbooks or surfing the web looking for just the right recipe to use it all up.

I am also a bit of a hoarder when it comes to using all parts of the food I buy.  One of my favorite take-aways from legendary chef Jacques Pepin is his advice to save all vegetable trimmings in the freezer so they will always be available to make fresh stock.  He keeps a bin in his freezer just for this purpose.  Clean carrot and potato peels, onion skins, mushroom stems, leek tops, parsley stems, celery trimmings and lots of other aromatics make their way into a ziplock bag that resides in my freezer. Whenever I have some chicken, beef, or lamb bones,  I add them to a kettle of water with the frozen scraps. On weeknights, I'll let the mixture simmer slowly all night long, and in the morning, I drain the solids and chill down the broth in an ice bath before placing it in the fridge to cool while I'm at work.  Upon returning home in the evening, I will again simmer the strained broth over a low heat all night long to reduce it further.  By the morning it's ready to chill, vacuum seal, and freeze for future use if I don't have an immediate need for it that day.  I have lots of other weird food-saving habits too, like always zesting lemons, limes, or oranges before juicing them. The zest stores really well in a baggie in the freezer, ready when needed. I save, seal, label, and freeze everything that might have some future use. If it's still hiding out after a few months, I will reluctantly toss it out, but only after making one last attempt to find a suitable recipe for its use.

The finished relish - it only gets better with age
The bottom line of all this rambling is that the podcast and Gunders' comments inspired me to inventory my veggie bin again. I found a recipe in Saveur magazine that called for two key ingredients I happened to have on hand - carrots and fresh horseradish root. After taking stock of the other items in my produce drawer, I realized I could modify the recipe slightly to use up some excess brussels sprouts,  parsnips, a piece of tumeric root, and a half of a shallot in place of some of the carrots.   The article touts this as a relish to accompany gefilte fish on Passover but I used it as a spread on toasted baguette slices and ate it for breakfast with a poached egg instead.  It was quick and easy to make, even on a workday. morning.  The flavors were bright and fresh, and a great way to start of the day.

Here is the link for the recipe:  Saveur recipe for Carrot and Horseradish Pickle Relish.

Carrots, horseradish, and lemon zest ready to pulse
The modifications I made were:  Used only two carrots, added 3 peeled parsnips, 5 brussels sprouts thinly sliced, a one inch piece of peeled diced turmeric root, and 1/2 of a large shallot, sliced thinly then minced.  The recipe instructs you to blanch the carrots.  I blanched the parsnips first, then pulsed them in the food processor, then set them aside.  Next I blanched the carrots and tumeric root together and processed the carrots/turmeric as directed in the recipe.  When making the pickling solution, I omitted the 1/4 cup sugar recommended in the recipe, and substituted two heaping teaspoons of Splenda (need to manage my blood sugar or else I would have used the regular sugar).  I added the pickling solution to carrot and horseradish mixture in a food processor and pulsed it until slightly chunky. At this point, I stirred in the shallots and Brussels sprouts, then let the whole mixture marinate for a few minutes while I poached an egg in the blanching water.

Also, while I was waiting for the water to heat for the initial blanching, I decided to make some parmesan cheese crisps to go along with the toasts. I preheated the oven to 400 degrees (miracle - my oven is still working... hope my luck holds out), and placed four little mounds, 1 tablespoon each, of grated parmesan cheese on a parchment paper-lined baking tray. I sprinkled each with some smoked paprika and a dash of cayenne then let them melt and crisp in the oven for about 3 minutes.  The combination of the salty cheese, the tangy relish, and the creamy egg yolk made a perfect light meal.

The end result:  this healthy and delicious breakfast!

Wednesday, February 10, 2016

Beads, Masks, and Kale Chips


Today was another very long day packed with big deadlines.  In the office by 7 AM, out at 8 PM plus another 90 minutes on the road.  I can't complain though, the work is intense but very interesting and the people I work with are great.  It's just hard to be stuck in front of a computer most of the day with little opportunity to move around.  This is definitely not how I had hoped to spend Fat Tuesday.

At least the cafeteria operator tried to create a mood of festiveness by serving Creole-inspired entrees and decorating everything with masks and beads.  I don't understand why they didn't take kindly to my suggestion that patrons had to flash some flesh in order to be served.  Personally I think it would have created a much-needed distraction to keep everyone from paying too much attention to the food. What is it with cafeteria food?  Despite the best efforts of the kitchen staff, no one could tell the difference between the shrimp etouffee, crawfish jambalaya, or chicken andouille gumbo -- it all looked and tasted like bland, soupy, red mush.

I got home a little before 9 PM and was not really in the mood to cook the miso eggplant I had planned for today.  I'd had leftover salad for dinner at the office and when I got home, I was craving carbs--crunchy carbs, crispy carbs, things like Kettle Chips or popcorn.  But alas.  There is never anything like that in our house. At best we might have a bag of "everything" pretzel crisps. What Joy.  I opened the vegetable crisper in the fridge to rummage through and suddenly, there it was - the inspiration I was looking for:  a bunch of kale.  Kale chips are almost like Kettle Chips, right?  If I could get my semi-broken oven to cooperate, there could possibly be some redemption. Since I didn't have a lot of kale left, I also added n some whole, large leaf spinach and a couple of carrots for good measure. I used a vegetable peeler to make thin slices of the carrots, which greatly enhanced their crisp-ability.

Sesame seeds and Furikake add a great crunch to the kale
I wanted to be sure the chips were well-baked and crunchy so I decided to add sesame seeds to the oil in which everything was tossed, and I also added the last of my furikake to increase the umami factor. The end result was a guilt free snack - no confession needed now on Ash Wednesday, at least not for cheating on my diet.


Kale, Carrot, and Spinach chips

Preheat oven to 400 degrees and line two baking trays with parchment paper.

1 small bunch kale, washed and dried very well (should be completely dry)
1 bunch spinach, washed and dried very well
2 carrots, washed and dried
1-2 Tbsp olive oil
1 Tbsp Furikake seasoning
2 Tbsp toasted sesame seeds (black or white or both)
1/2 tsp salt
pinch of cayenne pepper

It's best to wash the vegetables when you first bring them home.  I usually wash and spin dry my greens, then roll them up in paper towels and place inside a plastic bag.  They last a week or longer this way and they are ready to use when needed.  You don't want water on the produce when you put it into the oven or the vegetables will steam instead of drying out, and you will end up with limp, wilted not-at-all-chiplike vegetables.

Combine the seasonings (Furikake, sesame seeds, salt, and cayenne) in a small bowl and stir to combine.  Using a vegetable peeler and pressing hard on to the carrot, peel off ribbons of carrot. Toss in a plastic bag with a drizzle of olive oil and a teaspoon of the seasoning mix.  Lay the carrot strips onto the parchment paper of one of your baking trays, leaving space in between each carrot.  Place in the oven and bake for 8-10 minutes. Check frequently to ensure they don't begin to burn.

Remove the tough stems from the kale and spinach, then cut into larger, rough pieces.  Add to the bag you used for the carrots, drizzle in the rest of the olive oil to lightly coat the greens, and sprinkle on the remaining seasonings,   Toss well, then spread in a thin layer onto the second baking tray.  Place in the oven and roast for about 8 -10 minutes or until the chips are crispy.  You may need to remove some of the more well-done chips and let others continue to bake for a little longer.  

Monday, February 8, 2016

Salad: It's What's for Dinner


Look at the carmelization on those brussels sprouts -- making them oh so sweet and delicious!
Today was exceptionally stressful at work, and I needed a dinner that was quick and refreshing because my commute home took nearly 2 hours and I was going to be late to my tap dance class. Salad fit the bill, so I decided to make one of my favorites which had the added benefit of further using up ingredients from my overstocked pantry.  As a perpetual dieter, I eat a lot of salads and they typically all have several basic components -- some type of lettuce, some type of nut, and some type of cheese.  To this base I usually add some additional fruits or vegetables and maybe an additional non-cheese protein source to achieve my desired flavor profile and suit my mood.


Salads can be really boring when you eat them all the time, so I like to mix up the components frequently, using a broad assortment of lettuces, nuts, and cheeses. At any given time I typically have three or four different varieties of greens handy and several choices of nuts and cheeses. Today, I had frisee, baby spinach, whole leaf spinach, and a perpetual supply of swiss chard from which to choose. I also had pumpkin seeds, cashews, walnuts, pecans and sesame seeds, and for the cheeses, I had a smoked English white cheddar, goat cheese, Irish Dubliner cheddar, and some fresh parmesan.

Too many vinegars -- another reason I needed to make salad today
I opted for the frisee because it's really crisp and also because I liked the color.  Food is all about looks, and the bright yellow-green color really appealed to me today. For the nut du jour, I selected pecans, and the cheese just had to be goat cheese.  I thought about coating it with herbed panko and baking it to make the classic French chevre chaud, but I was in too much of a hurry so I just crumbled it up instead.  For the dressing, I made a basic vinaigrette using some walnut oil, tarragon mustard and red wine vinegar that I had on hand.

Frisee and Brussels Sprouts Salad for Two

1/2 lb brussels sprouts
2 Tbsp olive oil
Salt & pepper
1/2 head of frisee, broken into bite size pieces, washed and spun dry
1/2 cup whole pecans
1 Tbsp butter
sprinkle of garlic powder
4 oz goat cheese

Vinaigrette
1/4 c walnut oil
2 Tbsp high quality red wine vinegar
1 tsp tarragon mustard or dijon mustard
1 Tbsp minced shallot
1/8 tsp each salt & pepper

Pre heat the oven to 400 degrees and line a baking tray with parchment paper.  Wash and trim the brussels sprouts then cut them in half.  Toss in a bowl with the olive oil, salt, and pepper until coated then roast, cut side down, on a baking tray for about 15 minutes or until they are very well-carmelized on the bottom.

While the sprouts are roasting, cut the frisee into bite-sized pieces and wash and spin dry. Place in salad bowl.

In a small skillet, melt the butter over medium heat and add the pecans.  Sprinkle with a strong shake of garlic powder and then toast the nuts until they darken and release their aroma, taking care not to burn them.  Let them sit and cool a bit - they will crisp up after about 3-4 minutes.  Do not mix them into the salad until just before you serve, to maintain the crispiness.

To prepare the vinaigrette, mix all the ingredients together with an immersion blender or a whisk. You can substitute whatever oil you may have on hand as long as it's fresh and fragrant.  Same goes for the vinegar - white wine vinegar, herb-flavored (non-balsamic) vinegar, or champagne vinegar would also work nicely.  Mustard helps to emulsify the dressing but if you don't have dijon you can substitute other types. I used a tarragon mustard as part of my pantry purge initiative.

To assemble the salad, place all the salad ingredients except the cheese in a bowl and mix together. Drizzle with just enough dressing to lightly coat the lettuce.  You can always add more dressing once it's plated, but you can never subtract, so go easy to avoid a soggy mess. Toss the salad and place on a plate.  Add the crumbled goat cheese and serve along with a nice glass of  chardonnay or pinot noir.